diyrebel

joined 1 year ago
MODERATOR OF
[–] diyrebel@lemmy.dbzer0.com 2 points 2 months ago* (last edited 2 months ago)

The metadata in the headers can be avoided using Memoryhole and similar protocols which embed the headers inside the encrypted payload. The problem is again barrier to entry. Low-tech users generally can’t even handle app installs on desktops.

When you say “worry”, that’s not the right word for it. My boycott against Google is not fear-driven. I will not feed Google anything it can profit from as an ethical stance. Even if an expert linux tor user were on Google, I’m not sure we could exchange email in a way that ensures Google gets no profitable data. If we use PGP coupled with Memoryhole to strip out the headers, I’m not sure Google would accept a msg with a missing or bogus From: header. But if so, Google still possibly learns the user’s timezone. Though that may be useless if Google learns nothing else about that user. But we’re talking obscure corner cases at this point. Such an expert user would have no Google dependency anyway.

MS/google-dependent friends are generally extremely low-tech. They don’t know the difference between Firefox and the Internet. They don’t know the difference between Wi-Fi and Internet. Linux -- what’s linux? They would say. At best, they just think of it as a mysterious nerd tool to be avoided. So what can I do wholly on my end to reach them via gmail without Google getting a shred of profitable data? Nothing really. So I just don’t connect directly with a large segment of friends and family. Some of them are probably no longer reachable. Some are in touch with people who connect to me via XMPP, so sometimes info/msgs get proxied through the few XMPP users. It’s still a shitshow because Google still gets fed through that proxied inner circle of friends and family. In the past when someone needed to reach me directly, they would create a Hushmail or Protonmail mail account for that temporary purpose (like coordinating a trip somewhere). But that option is mostly dead.

I just had to reach out to plumbers for quotes. All of them are gmail-served. All I could do is refuse to share my email address and push them to use analog mechanisms. They are not hungry enough for business to alter their online workflow or create protonmail accounts.

[–] diyrebel@lemmy.dbzer0.com 2 points 2 months ago* (last edited 2 months ago) (2 children)

That’s exactly what I did with hushmail. I would tell low-tech folks to get a hushmail account then I would use hushtools.com to do all the key management, putting my key on the keyring and grabbing their key. So the other person did not need to know anything or take any special steps. That was best option of my time. But last time I checked hushmail was still entirely non-gratis.

Protonmail emerged when HM became non-gratis and messed with hushtools. But PM requires every one of their own users to do key management which creates a barrier to entry. I would have to walk a PM user through adding my key to my record in their address book and walk them through sending me their key. That effort is a show stopper for many. I might as well walk them through setting up a PGP-capable MUA. But then if they keep their gmail or MS acct the metadata still feeds those corps.
[–] diyrebel@lemmy.dbzer0.com 1 points 2 months ago* (last edited 2 months ago)

This simple answer is no doubt the most overlooked; probably as a consequence of the tyranny of convenience.. people too lazy to go to the library.

[–] diyrebel@lemmy.dbzer0.com 2 points 2 months ago (4 children)

I give out my XMPP address and offer Snikket accounts. Some go along with it and some do not. I lost touch with some friends. Some people are in contact via phone but that’s not ideal some connections are lost as phone numbers change.

I used to push some people toward Hushmail until they dropped the gratis plans. Then for a while I pressured people onto Protonmail but then distanced myself from PM when the brought in Google reCAPTCHAs and killed off Hydroxide. Tuta is a non-starter because Tuta’s variety of e2ee is incompatible with open standards, thus forcing me to periodically login to a web UI (also due to them sabotaging their Android app by way of forced obsolescence pushed in the most incompetent way).

So it’s a shitty state of affairs. 2024 and simply sending a msg to someone has become a total shitshow.

[–] diyrebel@lemmy.dbzer0.com 1 points 2 months ago* (last edited 2 months ago) (1 children)

For what it’s worth, I didn’t mean take the sensor out of the wall, but just electrically unplug it from the controller to see what it does on its own when you turn on the water.

Yeah I figured that but the terminals on the sensor are hard to reach so I was figuring I would need to remove it. But then it occurred to me that I could leave the thing in place and do the isolated test by unplugging the X2 connector from the motherboard and easily access the pins through that connector. So that’s what I did. Results:

  • at rest, the signal wire is 4.75 V
  • water running, the signal wire is 2.3 V

So in isolation the sensor worked correctly. Then I plugged it back into the motherboard and retested to confirm again the bad voltages. But in fact the readings were correct. It’s unclear why it works now. I wonder if the unplugging and replugging of the x2 connector improved a connection that deteriorated somehow.

Thanks for saving me €36! However incidental. If I had not done the test in isolation, I probably would not have messed with the X2 connector. I would have normally just replaced the sensor as an experiment.

(edit) I can hear a ticking sound coming from the motherboard. I’m not sure how long it’s been doing that. It’s quite faint unless I put my ear close to the board. Maybe it’s normal.

[–] diyrebel@lemmy.dbzer0.com 1 points 2 months ago* (last edited 2 months ago) (4 children)

It shows 5V on the diagram but I don’t think that’s precise. I measured the red wire at 4.68v which is around what the guy in the video got in his test. Since the board is part of the circuit I suppose I cannot rule out the board as a problem. Testing the sensor in isolation will be rough going because it’s a proprietary joint. So I would have to get a tight rubber hose and fit that onto a garden hose. For powering it I have a switchable ac adapter with a 4.5 V setting. Or I can maybe get 5V off a USB charger or ATX PSU from a PC. My multimeter does not have a frequency function but I can see from the video that it would be useful for this so I might look for 2nd hand multimeter at the next street market, though that will set me back a week (OTOH might be worth it if it helps diagnose this in a way that helps avoid buying the wrong part).

Whatever is broken here, it was something that gradually failed. For several months it was a gamble when turning on the hot tap whether the boiler would detect it and give hot water. It was like a 50/50 game of chance for a while then getting hot water became progressively less likely until it flatlined.

[–] diyrebel@lemmy.dbzer0.com 1 points 2 months ago

It shows 5V on the diagram but I don’t think that’s precise. I measured the red wire at 4.68v which is around what the guy in the video got in his test. Since the board is part of the circuit I suppose I cannot rule out the board as a problem. Testing the sensor in isolation will be rough going because it’s a proprietary joint. So I would have to get a tight rubber hose and fit that onto a garden hose. For powering it I have a switchable ac adapter with a 4.5 V setting. Or I can maybe get 5V off a USB charger or ATX PSU from a PC. My multimeter does not have a frequency function but I can see from the video that it would be useful for this so I might look for 2nd hand multimeter at the next street market, though that will set me back a week (OTOH might be worth it if it helps diagnose this in a way that helps avoid buying the wrong part).

[–] diyrebel@lemmy.dbzer0.com 1 points 2 months ago* (last edited 2 months ago) (8 children)

Yeah, if by /in system/ you mean connected to the board. I didn’t mess with anything other than to stick my probes onto the wires. The boiler is not switching on to heat water and it acts just as if it is not detecting that water is running. So a broken flow sensor was one of the theories. And since the readings seem quite off from what’s expected I guess buying a new sensor is the right move.

Once I get it removed I’ll see if it looks like I can rebuild it but I don’t expect that to go well. I may not have to waste it though. Considering the at rest voltage is double the running water voltage, it’s still detecting water running. It’s just not giving the voltage the board expects. So one idea is maybe I can repurpose this to turn on a shower light when the shower water is running.

If I had an electronics background I would probably try to do a makeshift gadget that converts 0.66 V to 2V and 1.33 V to 0 V. Then I wouldn’t need a new sensor (which could cost €100.. i’ve not checked locally yet but online prices are looking terrible).

[–] diyrebel@lemmy.dbzer0.com 4 points 2 months ago

Thanks for the feedback. I see that that’s indeed the case.


cross-posted from: https://lemmy.dbzer0.com/post/26703241

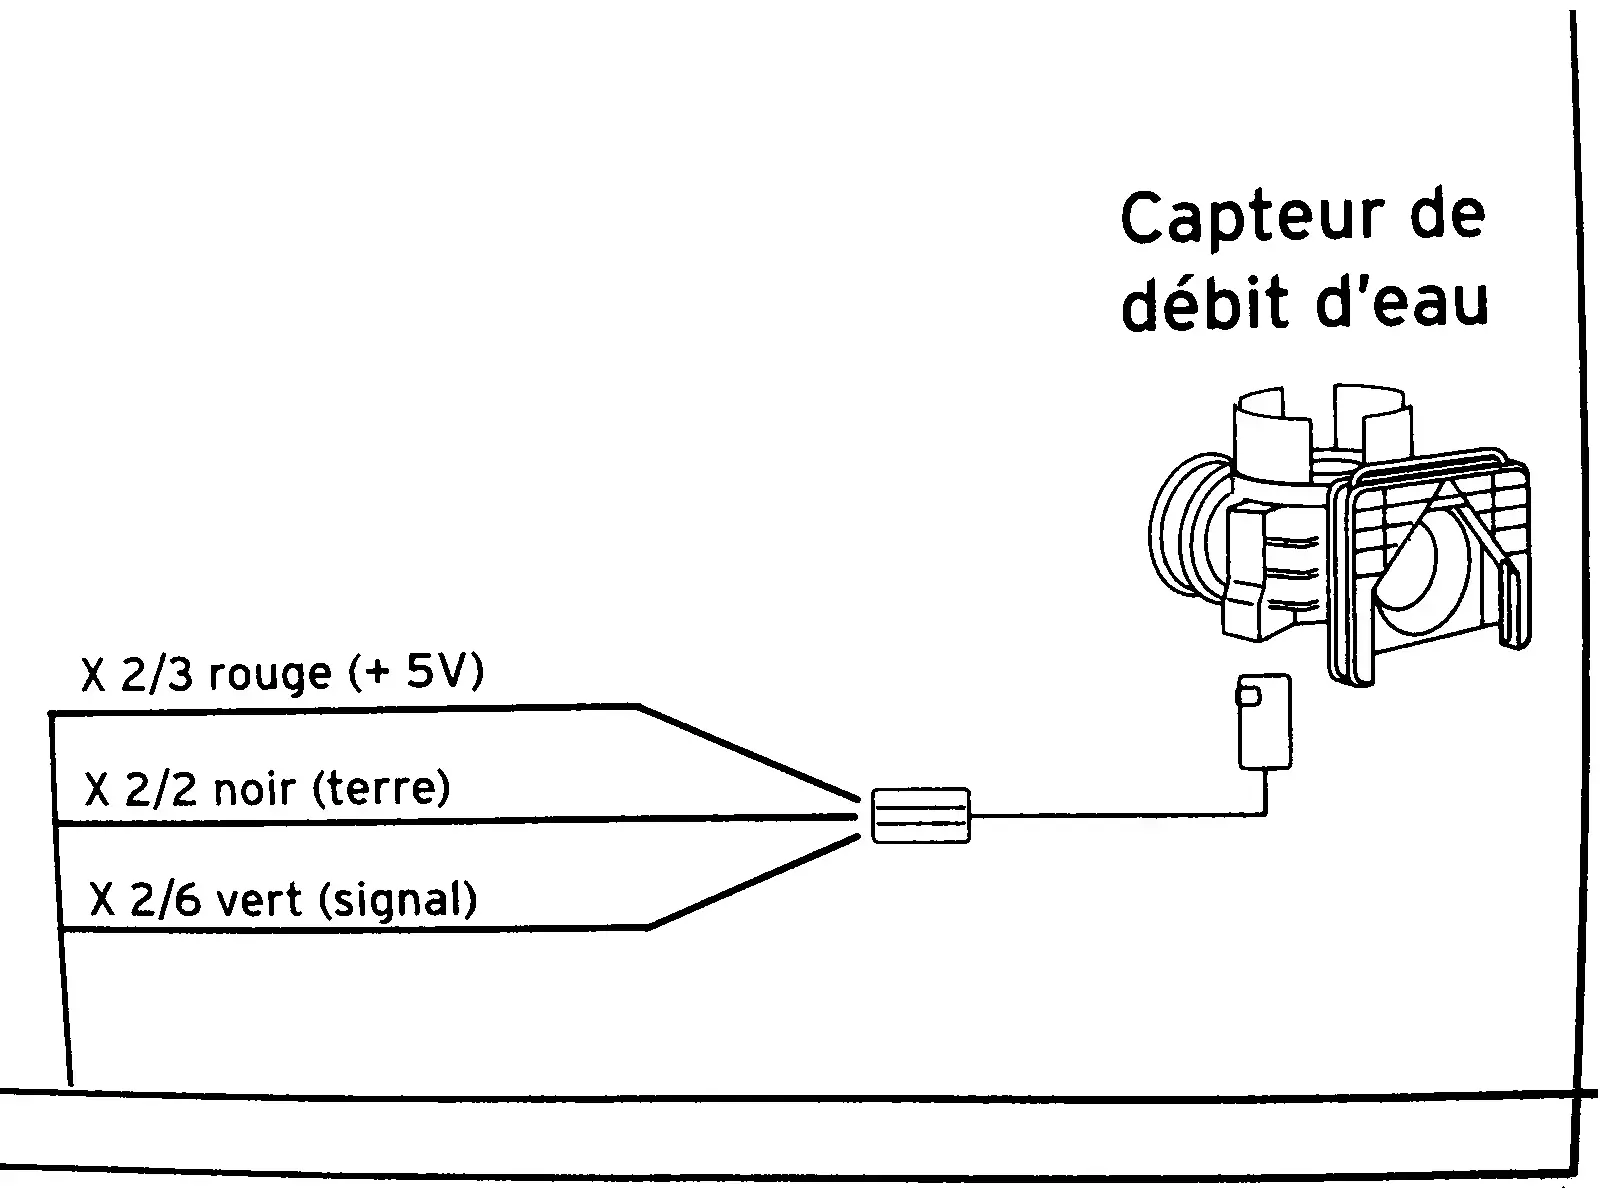
This diagram is from the service manual of a combi boiler. It’s a flow sensor which detects whether hot water is running, which is then used to trigger on-demand heat and switch a diverter to take radiators out of the loop.

In English, the diagram shows:

  • X ⅔ red wire (+5V)
  • X 2/2 black wire (ground)
  • X 2/6 green wire (signal)

I need to know what those fractions mean. I took the voltage measurements in this video:

I cannot necessarily trust the model in that video to have the same specs as mine. My voltmeter detected 4.68 V on the red input wire showing that the sensor is well fed. The green “signal” wire is supposed to be 0 V at rest and 2 V with water running (or I think the reverse of that is used in some models). In my case the green wire is ~1.33 V at rest and ~0.66 V when water is running. I need to know if these readings are normal as I troubleshoot this problem.

update


@unexposedhazard@discuss.tchncs.de and a couple others gave the answer I was after. Then @tofubl@discuss.tchncs.de helped solve the underlying problem. The theory that the sensor was fine but the board was not drove me to test the sensor in isolation. The sensor gave correct output in isolation. Then I connected it back to the motherboard to retest and reconfirm that it’s still broken. But it actually worked. The hot water suddenly and mysteriously works now. I guess the act of draining the water and unplugging the connector then reconnecting and repressurizing caused it to work. It may be temporary, since in the past it was hit or miss whether it would work.


This diagram is from the service manual of a combi boiler. It’s a flow sensor which detects whether hot water is running, which is then used to trigger on-demand heat and switch a diverter to take radiators out of the loop.

In English, the diagram shows:

  • X ⅔ red wire (+5V)
  • X 2/2 black wire (ground)
  • X 2/6 green wire (signal)

I need to know what those fractions mean. I took the voltage measurements in this video:

I cannot necessarily trust the model in that video to have the same specs as mine. My voltmeter detected 4.68 V on the red input wire showing that the sensor is well fed. The green “signal” wire is supposed to be 0 V at rest and 2 V with water running (or I think the reverse of that is used in some models). In my case the green wire is ~1.33 V at rest and ~0.66 V when water is running. I need to know if these readings are normal as I troubleshoot this problem.

[–] diyrebel@lemmy.dbzer0.com 4 points 2 months ago* (last edited 2 months ago) (6 children)

I refuse to fund my oppressors

Bingo. I live by this philosophy.

Although more precisely: I refuse to ~~fund~~ feed my oppressors. The reason for s/fund/feed/ swap is that our oppressors profit from our data too. So e.g. I won’t even email a gmail user because my data would then feed Google (an oppressor because of how they dictate e-mail terms among other oppressions).

[–] diyrebel@lemmy.dbzer0.com 1 points 9 months ago* (last edited 9 months ago) (1 children)

It basically is saying that if you have more money then you have more “votes”.

That’s simply true. It doesn’t do anyone any good to disregard the facts.

Or to put it in another way: If you have more money you matter more.

That abstraction doesn’t help much. And first of all, it’s more accurate to derive the statement “If you have more money then you have more influence”.

It’s still a shitty status quo, but it is what it is. The worse thing you can do is tell people not to boycott shit products on the basis of rejecting reality. It’d be like telling people not to vote in elections because their vote is a drop in the ocean.

Some people vote for democrats, then they cancel their own vote by getting their internet service from Spectrum, buying fuel from Chevron for their car, shipping their packages using FedEx, getting their phone service from AT&T, banking at PNC Bank, flying on Boeing planes, shopping on Amazon, doing their web searches on a Microsoft syndicate’s site (e.g. DDG), buying Sony devices.. etc. They either have no clue that most of their voting is actually for the republicans, or they think that drop-in-the-ocean vote that comes once in 4 years somehow carries more weight than the daily votes they cast with reckless disregard.

Greg Abbott’s war chest is mostly fed by oil companies. If you buy fuel for a car, you help Greg Abbott and other republicans. And if you buy from Chevron, you give the greatest support to republicans (Chevron is an ALEC member).

[–] diyrebel@lemmy.dbzer0.com 3 points 9 months ago* (last edited 9 months ago)

You might let her know that she can borrow DVDs from the public library at no cost. Another little-known gratis option is freesat and terrestrial broadcast. I recently started using MythTV as a PVR to record broadcast TV and was pleasantly surprised to find no commercial interruptions (but if there are commercials in her region, MythTV can cut them out).


cross-posted from: https://lemmy.dbzer0.com/post/8959162

I had a rod that was threaded on one half and smooth on the other half. I needed the smooth half to be installed into brick.

method 1: chemical anchor

The normal way to do this (I think) would be to cut some grooves into the rod using an angle grinder, drill a hole that has a diameter that’s ~2mm bigger than the rod, and use chemical anchoring. But that stuff is pricey and only lasts ~1 year on the shelf. Thus cost ineffective for 1 use.

method 2: ad hoc chemical anchor substitute

Similar to the above, I wonder if general 2-component household epoxy would work as a substitute in the above method since people are more likely to have that on-hand. I suspect the issue is that it’s too thin and gravity would do its thing and the topmost area would not get filled with epoxy. Hence why I did not attempt it.

method 3: (What I did)

The rod measured at ø=8.8mm. I had no 9mm drill bit for masonry (and that would be too loose anyway). So I used a nominal 8mm masonry bit on a hammer drill. I’m not sure what the actual diameter of that resulting hole was, but it was too tight to push in the 8.8mm rod in by hand. So I tapped it in, dry (no oil or glues). It worked! It feels really solid. Feels like I got away with murder.

Questions

(method 2) Is there something could be mixed with common 2-component household epoxy to thicken it so it acts more like chemical anchor epoxy?

(method 3) Did I take bad risk with fracturing the brick? Is there perhaps a guide somewhere that safely maps brick hole diameter to metal rod diameter? Or is this something is never done and should never be done?


cross-posted from: https://lemmy.dbzer0.com/post/8959474

cross-posted from: https://lemmy.dbzer0.com/post/8959162

I had a rod that was threaded on one half and smooth on the other half. I needed the smooth half to be installed into brick.

method 1: chemical anchor

The normal way to do this (I think) would be to cut some grooves into the rod using an angle grinder, drill a hole that has a diameter that’s ~2mm bigger than the rod, and use chemical anchoring. But that stuff is pricey and only lasts ~1 year on the shelf. Thus cost ineffective for 1 use.

method 2: ad hoc chemical anchor substitute

Similar to the above, I wonder if general 2-component household epoxy would work as a substitute in the above method since people are more likely to have that on-hand. I suspect the issue is that it’s too thin and gravity would do its thing and the topmost area would not get filled with epoxy. Hence why I did not attempt it.

method 3: (What I did)

The rod measured at ø=8.8mm. I had no 9mm drill bit for masonry (and that would be too loose anyway). So I used a nominal 8mm masonry bit on a hammer drill. I’m not sure what the actual diameter of that hole was, but it was too tight to push in the 8.8mm rod in by hand. So I tapped it in, dry (no oil or glues). It worked! It feels really solid. Feels like I got away with murder.

Questions

(method 2) Is there something could be mixed with common 2-component household epoxy to thicken it so it acts more like chemical anchor epoxy?

(method 3) Did I take bad risk with fracturing the brick? Is there perhaps a guide somewhere that safely maps brick hole diameter to metal rod diameter? Or is this something is never done and should never be done?


cross-posted from: https://lemmy.dbzer0.com/post/8721869

Parts like sprockets, chains, hubs, BBs, etc are quite useful for projects to build tools, furniture, art. I get them at no cost by dumpster diving. Cleaning them is quite a pain though. These are some of the options I’ve considered:

  • dishwashing machine— if normal dishwasher detergent is used, I would expect it to corrode aluminum parts (correct? Can someone confirm or deny that?) Chains and /some/ sprockets are steel, right? Would they do well in the dishwasher? I wonder if there is some kind of alternative detergent that won’t harm aluminum since I always have to hand-wash an aluminum pot cover.

  • ultrasonic bath— this method strikes me as the most convenient and what I would expect someone who needs to clean lots parts to use. But there is a risk of de-anodization if you use degreaser. Some jewelers use ultrasonic cleaners with a cocktail of Mr. Clean and ammonia. Would that work well on bicycle parts, non-destructively?

  • Enzyme-based oven cleaner— I tested this on sprockets and it seemed to work quite well but doesn’t get into the nooks and crannies and dissolve any of the mud.

  • Enzyme-based drain cleaner— instructions say wait 6 hours, so i did not test it. Is that time perhaps just because it takes that long to spread down the drain and munch on large volumes of gunk? Perhaps it would work in less time on bicycle parts.

  • boiling water with dish soap— I hoped it would melt the greasy grime. The water was quite dirty afterwards but did not make much noticeable progress.

  • degreaser spray— did not test this. I just have degreaser for kitchen surfaces so maybe not the right stuff.

  • bicycle cleaning spray— kind of strange that this exists. Bicycles have many different materials and different kinds of grime. It did not do too well on greasy sprockets as far as I could tell.

Question on the enzyme-based cleaners: enzymes are a bit pricey by volume compared to other cleaners. Is there a way to store and reuse them? Ideally I would like to pour a bottle of enzyme-based drain cleaner into a bucket and just always soak parts in that same bucket. Do those little guys multiply when you feed them? If the water is always dirty, will the enzymes always be too full to chow down on parts being added?


When clicking the cross-post icon, a search box appears where you can select the community to cross-post to. It shows announcement communities that disallow posting. It allowed me to select !lemmyverse@lemmyverse.org. But then when I clicked “create” it just goes to lunch and gives an endless spinner. That’s a really shitty behavior. The user has no idea why it’s hanging when in fact there should be no hangup at all.

I did not know !lemmyverse@lemmyverse.org had restricted posting until I went there to see if I could post directly. The search dialog in the cross-posting form should print a prohibited icon or warning icon (⚠) next to communities where posts are impossible. This would show users there will be a problem but in a way that does not ignore the existence of those communities. And if they select such communities anyway, they should get a hard and fast proper error msg.


cross-posted from: https://lemmy.dbzer0.com/post/6251091

I have this:

https://www.aquaplan.com/product/easy-band/

I need to attach it vertically to some thick hard rubber roofing. There is a small section of roof which should probably normally have a parapit but instead the roofing rubber is not backed by anything. Then below it is a wood panel. So when it rains sideways the water runs down the roofing rubber and behind the wood panel.

I just need a piece of shingle to divert water to the exterior side of the panel. Roofing glues are made to never cure. Probably rightfully so, but that probably wouldn’t work to attach a shingle vertically as gravity would over power that tar-like never fully dry stuff. I tried construction adhesive & it didn’t hold.


Apart from Cloudflare being an access restricted walled garden that harms interoperability, I really do not want my content on CF & I do not want CF content reaching me. This bug is one of many issues likely caused by Cloudflare:

https://lemmy.dbzer0.com/post/4806490

I would like to flip a switch that has the effect of making my whole UX Cloudflare-free. Cloudflare is antithetical to decentralization and it has clearly broken the #Lemmy network.


I tried to post in a zerobytes.monster community from a normal (non-Cloudflared) instance using Tor Browser. When I clicked the button to submit the post, it just became an endlessly spinning icon.

Then I posted on a non-Cloudflare instance instead, which worked fine. Then I tried to cross-post it to zerobytes.monster. Again, non-stop spinner.

I suspect the problem is that even though I’m actually on node A, when I direct the content to post on node B there is perhaps a direct connection being made to node B. When node B is tor-hostile (e.g. Cloudflare) it’s blocking the packets. But the software is not smart about this.. just leaves the user hanging.

Now I wonder if the other endless spinner I encountered when trying to create an account somewhere is a Cloudflare-induced issue as well:

https://lemmy.dbzer0.com/post/4525532


Filled out the reg. form, filled out the CAPTCHA, and hit the “sign up” button which then turns into a spinner. The spinner never stops. Confirmation email never arrives.

Lemmy devs: please give output rather than just spinners. We have no way to know what is going on or how long it takes to process a registration form. We should receive error messages rather than a forever loop.


I click LOGIN, enter my username, tab over to the password field and as I’m entering the password the username clears. So then i have to go back to the username field and re-enter it.

It’s as if the page is still loading but as a final action in the loading process it clears the form. I’m not a javascript expert but it feels like excessive use of js for something that should simply be html.

#LemmyBug

view more: next ›